Traveling solo is an exhilarating experience. The freedom to go wherever you please and make every decision based on your personal preferences is liberating. However, one of the common challenges for solo travelers is capturing those memorable moments, particularly, photos of yourself.
Without someone around to take your picture, you may feel stuck relying on awkward selfies or skipping photos entirely. But don’t worry—if you’re exploring historical landmarks, hiking through nature, or simply enjoying the local café culture, there are many ways to take amazing photos of yourself while traveling solo.
This guide is packed with practical tips, techniques, and inspiration for taking flattering and memorable photos when you’re traveling on your own.
1. Plan Your Photos in Advance

Before you even head out for the day, think about where and how you’d like to capture some moments. Research the places you plan to visit.
Find out where the best viewpoints are, and if there are specific times when the lighting is just right, especially during golden hour (shortly after sunrise or before sunset). Planning ahead can make a significant difference in the quality of your photos.
For instance, if you want a photo at a popular tourist spot, going early in the morning could give you a quieter setting with fewer people. A little pre-trip planning will also help you decide whether you need to pack additional gear, such as a tripod or a remote shutter.
2. Use Tripods
A tripod is your best friend when traveling solo. It’s an essential tool for setting up stable, well-composed shots without needing another person. You don’t need to lug around a massive professional setup—compact, lightweight tripods are easy to carry and can be stored in your backpack.
Many travel tripods are collapsible and can extend to a decent height, allowing you to take full-body shots or beautiful landscape images with you in the frame. Position the tripod where you want, set your camera or phone, and you’re ready to go. You can even use your tripod for creative angles—positioning it low for a dramatic effect or high for an aerial-like shot.
3. Use a Remote Shutter or Self-Timer
 You don’t have to run back and forth between the camera and your spot if you have a remote shutter. Remote shutters are inexpensive and easily connect to your camera or smartphone via Bluetooth. They allow you to take photos from a distance, giving you time to pose naturally and adjust without the rush of a timer.
If you don’t have a remote, your phone’s self-timer can work wonders. Set it for 5 to 10 seconds, depending on how far you need to walk or adjust your position.
Some apps also allow for multiple shots in one go, giving you the chance to change poses quickly and pick the best one later.
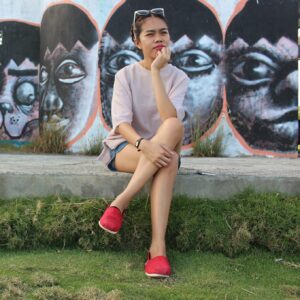
4. Find Interesting Backdrops
When traveling solo, your surroundings play a major role in how dynamic your photos turn out. To make your self-portraits more engaging, pay attention to your environment.
Consider using vibrant murals, lush greenery, or iconic landmarks as your backdrop. Instead of standing directly in front of the backdrop, try placing yourself slightly off-centre, allowing the background to complement you rather than overshadow you.
For instance, if you’re at a scenic beach, try positioning yourself on the side with the waves crashing behind you, or if you’re in a bustling market, stand amidst the action but make sure you’re clearly visible.
Also, don’t be afraid to experiment with depth by standing further away from the camera or incorporating natural elements like trees or archways that help frame your shot.
5. Experiment with Angles and Perspectives
 Taking photos of yourself doesn’t have to be limited to traditional poses and eye-level shots. Playing with different angles and perspectives can lead to more captivating and dynamic images.
Try shooting from a lower angle to make yourself appear taller and more dramatic against a sky or landscape. Alternatively, shooting from a high angle can create a more intimate or creative feel.
You can place your camera on the ground, a ledge, or any steady surface to achieve different perspectives.
Don’t be afraid to get creative—side profiles, silhouette shots, or photos that use mirrors or reflections can make your photos stand out.
| Technique | Effect | How to Achieve | Best For |
|---|---|---|---|
| Low-Angle Shot | Makes subject appear taller and more dramatic | Position the camera below eye level, aim upwards | Capturing expansive backgrounds (sky, landscapes) |
| High-Angle Shot | Creates an intimate or creative feel | Hold or place the camera above eye level, angle downward | Portraits, storytelling shots |
| Ground-Level Shot | Unique and immersive perspective | Place the camera on the ground or a stable surface | Wide-angle, artistic shots |
| Side Profiles & Silhouettes | Adds mystery and artistic flair | Use side lighting or backlighting for silhouettes | Mood-driven, dramatic photography |
| Reflections & Mirrors | Creates visual interest and depth | Use reflective surfaces like mirrors, windows, or water | Abstract and creative compositions |
6. Make Use of Natural Light
Lighting is one of the most important aspects of photography, and when you’re on your own, taking advantage of natural light is key. The best times of day for soft, flattering light are during the golden hour—early morning or late afternoon. At this time, the sun casts a warm, gentle light that enhances your features without harsh shadows.
If you’re taking photos midday, look for shaded areas to avoid harsh sunlight. Overcast days are also great for photography, as the clouds naturally diffuse the light, creating an even, soft glow.
Keep an eye on how the light hits your face and adjust accordingly. Facing the light source directly usually provides the best results, but side lighting can also create a more artistic, moody feel.
7. Use Burst Mode for Action Shots
For more spontaneous photos—such as jumping in the air, walking, or twirling—use your camera’s burst mode feature.
Burst mode takes a series of photos in quick succession, allowing you to capture motion without missing the best moment. This technique is perfect for action shots, giving you plenty of options to choose from afterwards.
Try walking slowly toward the camera or turning your head for a candid, natural look. You’ll likely find one shot in the series that stands out, capturing that split-second perfect pose.
8. Don’t Be Afraid to Ask for Help
 Though the idea of taking photos yourself while traveling solo is empowering, sometimes asking a stranger for help can give you a fresh perspective. Most people are willing to take a photo for you, and you can always politely direct them on how you’d like it to look.
Give clear instructions about framing or demonstrate with your hands where you’d like them to focus. Don’t forget to return the favour! Offering to take their photo is a kind gesture and can even lead to fun interactions and new friendships.
9. Utilize Everyday Objects
When a tripod isn’t an option, don’t hesitate to get creative with what’s around you. Benches, ledges, rocks, and even books can serve as temporary camera stands. Ensure that whatever you’re using is stable enough to hold your camera or phone without risking damage.
You can also use your backpack, water bottle, or even a scarf to help balance your device if needed. If you find the perfect angle but need just a little extra height, stacking items can help you achieve it.
10. Practice Your Poses
The more comfortable you are in front of the camera, the more natural your photos will look. Spend some time practising poses before your trip or experiment with different poses during your travels. Relax your body, try leaning slightly to one side, crossing your legs, or resting your hand on your hip.
Avoid stiff, unnatural stances by shifting your weight and keeping your movements fluid. If you’re unsure what looks good, take a few test shots and adjust your pose accordingly. Confidence shines through in photos, so the more comfortable you feel, the better your shots will turn out.
11. Use Editing Apps to Enhance Your Photos
Editing can be the finishing touch that takes your solo travel photos from good to great. Many free or affordable photo editing apps, such as Lightroom, Snapseed, or VSCO, offer tools to enhance your images. Simple adjustments to brightness, contrast, and saturation can make a world of difference.
You don’t need to over-edit—aim for natural enhancements that highlight the beauty of the moment and the surroundings. You can also experiment with filters to create a consistent theme or aesthetic for your travel photos, making them more cohesive if you plan to share them on social media.
12. Take Candid Shots

Not every photo needs to be a posed, perfectly structured portrait. Sometimes the most captivating photos are the candid shots, capturing you in the moment, immersed in your surroundings.
Consider taking photos while you’re exploring, sipping a coffee, reading a book, or walking through a local market. These types of images feel more authentic and tell a story about your solo journey. Set up your camera, press the shutter, and forget it’s there for a few moments as you enjoy your surroundings.
Taking photos of yourself while traveling solo doesn’t have to be daunting or complicated. With the right tools, a bit of creativity, and some practice, you can capture beautiful, memorable images that reflect your experiences. Remember that photography is not just about the technical aspects; it’s also about having fun and expressing yourself. Don’t stress too much about perfection—embrace the spontaneity of solo travel and enjoy the process of capturing the moments that matter most to you.
If you’re a beginner or an experienced traveller, these tips will help you make the most of your solo photo adventures, allowing you to come home with a collection of meaningful and beautiful images to look back on for years to come.
Frequently Asked Questions
What equipment do I need to take good self-portraits while traveling solo?
To achieve quality self-portraits, consider investing in a few key pieces of equipment. A sturdy tripod is essential for stability, allowing you to set up your camera or smartphone at various heights. A remote shutter or a self-timer feature helps capture images without needing to rush back to your position. If you’re serious about photography, a good camera with interchangeable lenses can elevate your shots. Finally, editing apps on your phone or computer can significantly enhance your photos after capturing them.
How do I choose the best locations for my photos?
Selecting the right location is crucial for stunning photos. Start by researching iconic landmarks and beautiful scenic spots in your destination. Local tourist boards or social media platforms can provide inspiration for hidden gems. Look for vibrant murals, natural landscapes, or unique architecture to use as backdrops. Also, consider the time of day, as some locations may be best during the golden hour when the light is soft and flattering.
What should I wear for my travel photos?
Your outfit can greatly influence the vibe of your travel photos. Choose clothing that reflects your personal style while being appropriate for the environment. Solid colors generally photograph better than busy patterns, helping you stand out against various backgrounds. Additionally, consider wearing layers to create visual interest; for instance, a jacket or scarf can add depth to your look. Ultimately, wear something comfortable that allows you to move freely, especially if you’re taking action shots.
Can I edit my photos on my phone?
Yes! Many smartphones come equipped with robust editing tools, and there are several user-friendly apps available for download. Apps like Lightroom, Snapseed, and VSCO allow you to enhance your images with just a few taps. Focus on adjusting brightness, contrast, saturation, and sharpness for a polished look. Be careful not to over-edit; instead, aim for natural enhancements that preserve the authenticity of the moment.
How can I make my selfies look more professional?
Achieving a professional look in your selfies involves paying attention to several key elements. First, utilize natural light whenever possible, as it creates a softer and more flattering effect than artificial lighting. Experiment with angles—try taking shots from slightly above or below eye level for variety. Framing your subject creatively, such as using leading lines or interesting backgrounds, can also elevate your photos. Finally, practice poses that feel natural and confident; your comfort will shine through in the final image.
Is it okay to ask strangers for help with photos?
Absolutely! Asking a stranger for help is a common practice among solo travelers, and most people are happy to assist. When approaching someone, be polite and clear about what you’d like. It’s helpful to demonstrate how you want the photo framed or even show an example on your phone. Offering to take a photo for them in return is a great way to build rapport and create a friendly interaction, which can enhance your travel experience.
What are some common mistakes to avoid when taking self-portraits?
To improve your self-portrait photography, avoid common pitfalls like cluttered backgrounds that distract from your subject. Poor lighting can result in unflattering images, so always try to shoot in good light conditions. Be mindful of your pose; stiff or awkward stances can diminish the overall quality of your photos. Lastly, ensure your camera is properly focused before capturing the shot, as a blurry image can be disappointing.
How do I stay safe while taking photos alone?
Prioritizing your safety while taking photos is crucial, especially when traveling solo. Always stay aware of your surroundings, particularly in crowded or unfamiliar places. Keep your belongings secure and within sight to deter theft. If you’re setting up for a shot, avoid secluded areas where you might be vulnerable. Trust your instincts; if a situation feels off, it’s better to move to a safer location. Sharing your travel itinerary with someone back home can also provide an extra layer of security.